Appearance
基于Ubuntu部署生产环境
生产环境总览
生产环境总览:
- 操作系统:Ubuntu 22.04
- 宝塔:宝塔Linux面板 稳定版9.0
- Python 版本 3.9
- MySQL 版本 8.0
- Nginx 版本 1.22.1
- Redis 版本 5
生产环境说明:
- 数据库、前端和后端等,部署在同一台服务器
- 示例中的服务器IP为192.168.0.71
生产环境安装
安装Ubuntu 22.04
关键安装选项:

IP信息按实际填写
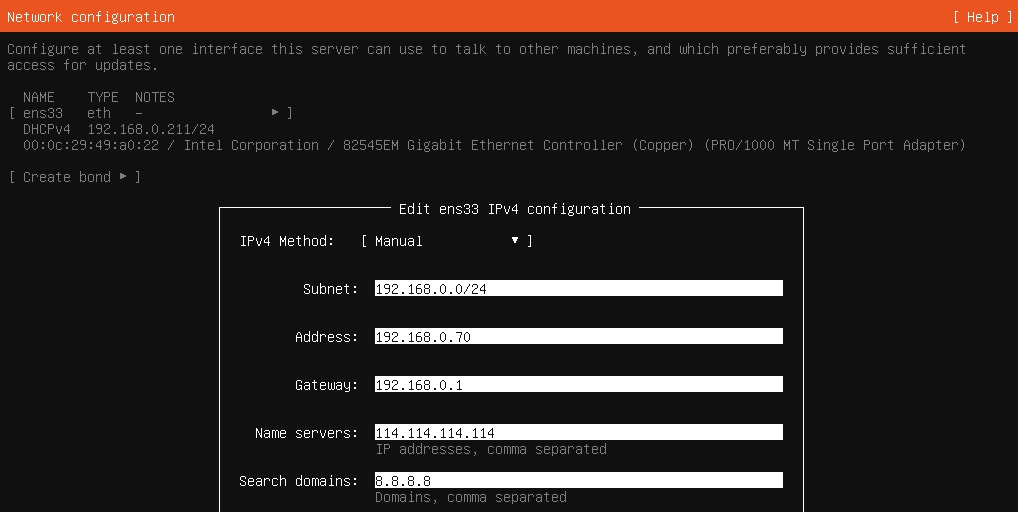

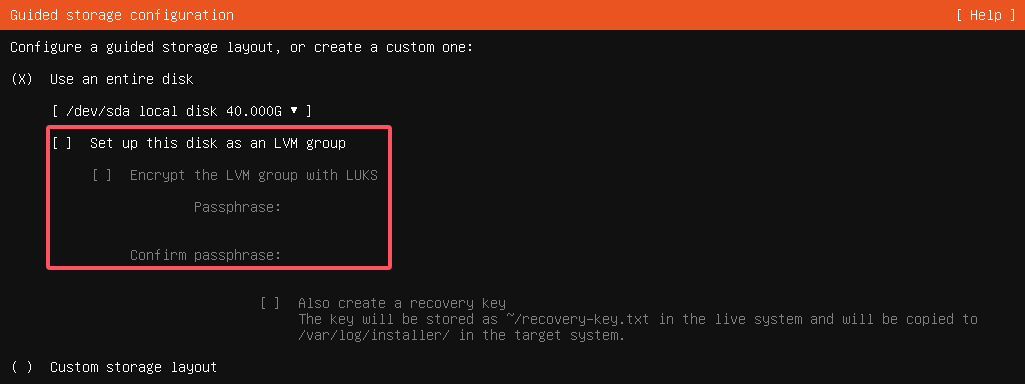
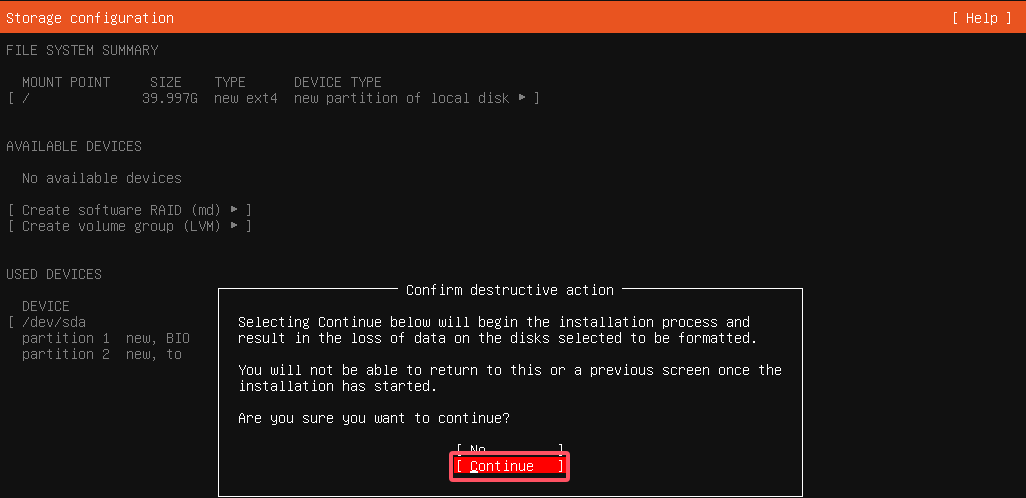

安装完成后,使用安装时设置的用户名和密码登录。进行基本设置:
sh
#设置root账号的密码
sudo passwd root

#使用root账号登录
su - root

#安装vim
apt upadte
apt install vim -y

#开启root的SSH登录
vim /etc/ssh/sshd_config
#把 PermitRootLogin without-password 改为 PermitRootLogin yes  。然后保存保存退出
PermitRootLogin yes

#重启SSH服务
systemctl restart sshd

#修改ip(可选)
vim /etc/netplan/50-cloud-init.yaml
#按需修改IP后,应用新IP
netplan apply
#禁用cloudinit还原已修改IP
echo "network: {config: disabled}" > /etc/cloud/cloud.cfg.d/99-disable-network-config.cfg
操作系统基本信息
python
#内核版本
Linux ubuntu22 5.15.0-122-generic #132-Ubuntu SMP Thu Aug 29 13:45:52 UTC 2024 x86_64 x86_64 x86_64 GNU/Linux

#IP信息
inet 192.168.0.71/24 brd 192.168.0.255 scope global ens33
优化Ubuntu 22.04
sh
#关闭防火墙
systemctl stop ufw
systemctl disable ufw

#调整时区和校时
apt update && apt install ntpdate
set-timezone Asia/Shanghai
ntpdate ntp3.aliyun.com && hwclock -w
timedatectl
优化内容包括:
- 时区调整
- 网络优化
- 内核参数优化
- 关闭自动更新
- 防火墙优化
- SELinux优化
- 服务优化
安装宝塔
使用root用户,SSH登录Ubuntu服务器
sh
wget -O install.sh https://download.bt.cn/install/install_lts.sh && sudo bash install.sh ed8484bec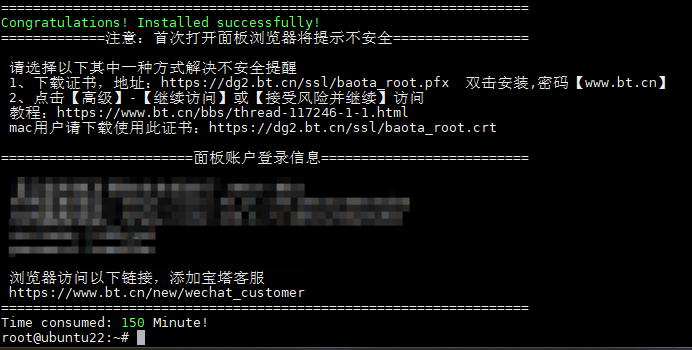
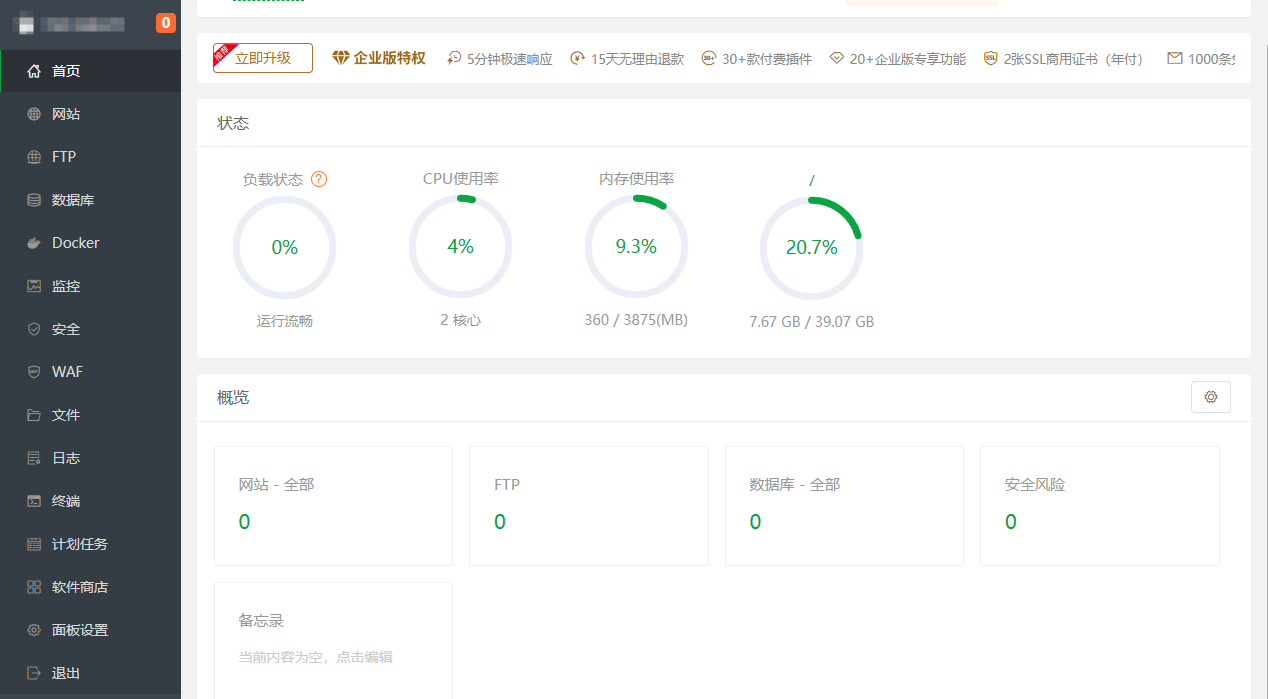
安装完成,根据情况选择内网或外网地址进行登录。
安装MySQL数据库
登录宝塔--数据库--MySQL--安装mysql环境,选择版本mysql 8.0.36,选择极速安装。

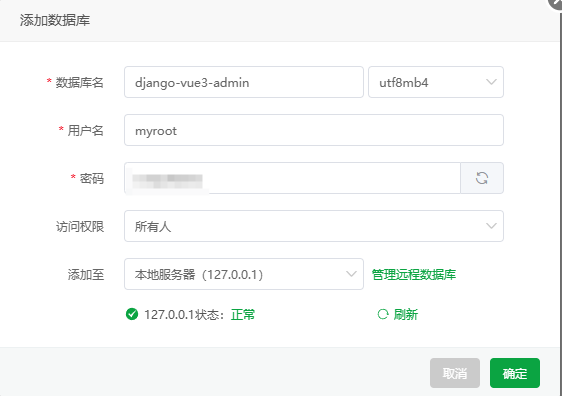
添加数据库
- 数据库名称:默认django-vue3-admin
- 编码:utf8mb4
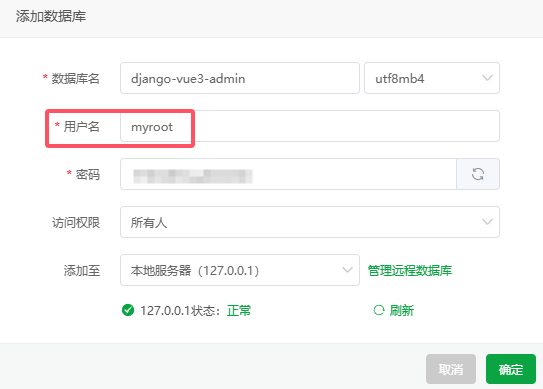
- 用户名:例如myroot
- 密码:填写数据库密码
- 访问权限:根据情况选择所有人,或本地服务器
- 添加至:选择本地服务器(127.0.0.1)
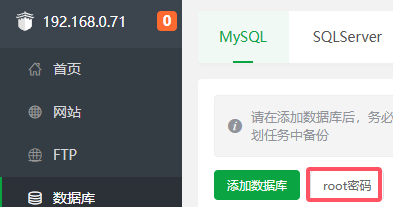
修改数据库root密码(可选)
修改数据库root登录权限(可选)
登录宝塔--终端,输入
sh
#使用root用户进入数据库 输入上面复制的root密码
mysql -u root -p

#使用mysql数据库
use mysql

#更新root用户权限,“%”指的是所有地址都可以访问
update user set Host='%' where User='root';

#最后一步,刷新权限即可
flush privileges;
安装Python
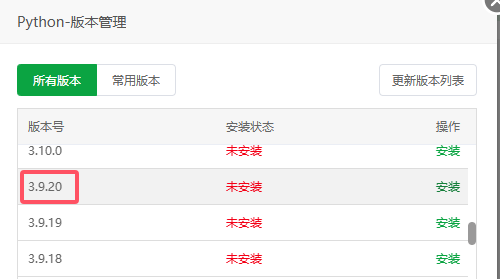
登录宝塔--网站--Python网站,点击安装Python 3.9.20
安装Nginx
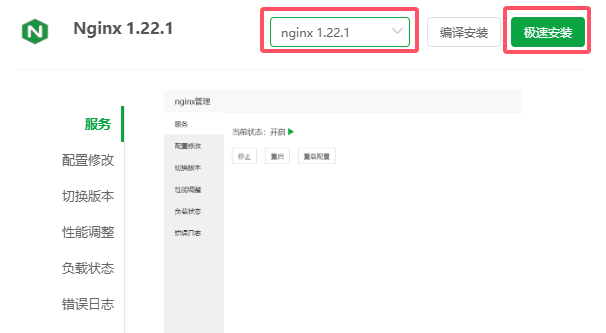
登录宝塔--网站--PHP项目,点击安装Niginx。
- 版本:nginx 1.22.1
- 极速安装
配置后端
生产环境下需要配置
- 关闭DEBUG
- 关闭Swagger
上传后端
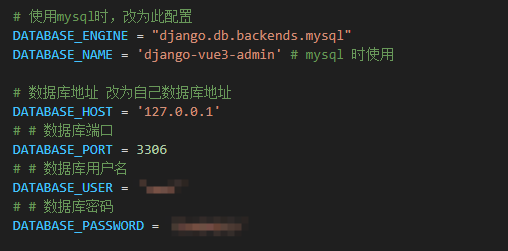
进入项目后端,编辑文件django-vue3-admin\backend\conf\env.py。修改填写刚才创建的数据库信息。
将项目后端文件夹backend,整个压缩为一个zip文件。
登录宝塔--文件--/www/wwwroot,点击上传刚才创建的backend.zip文件。上传成功后,右击选择解压。
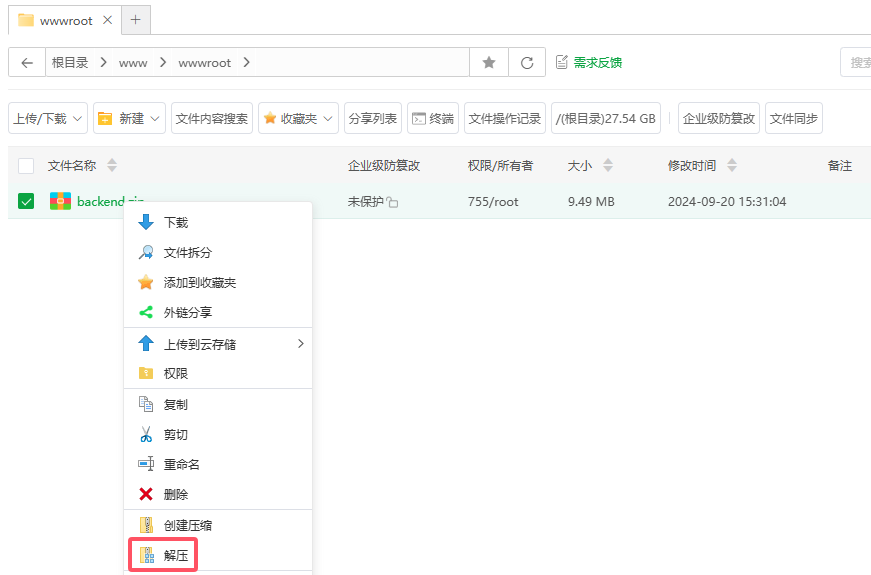
解压后结果如下

部署后端
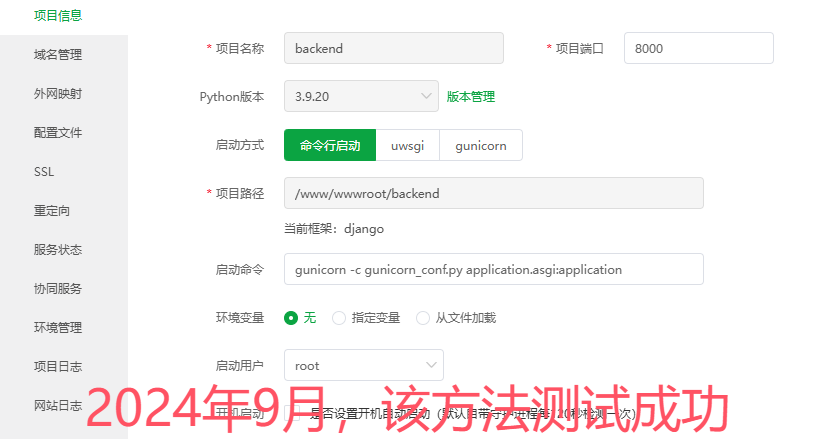
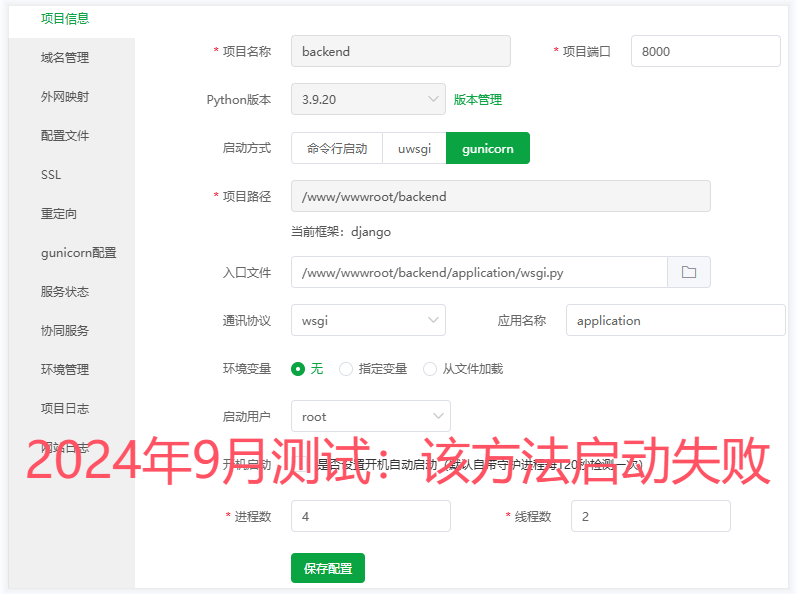
登录宝塔--网站--Python项目,点击添加Python项目。按图填写信息。
- 启动方式:命令行启动
- 启动命令:
gunicorn -c gunicorn_conf.py application.asgi:application
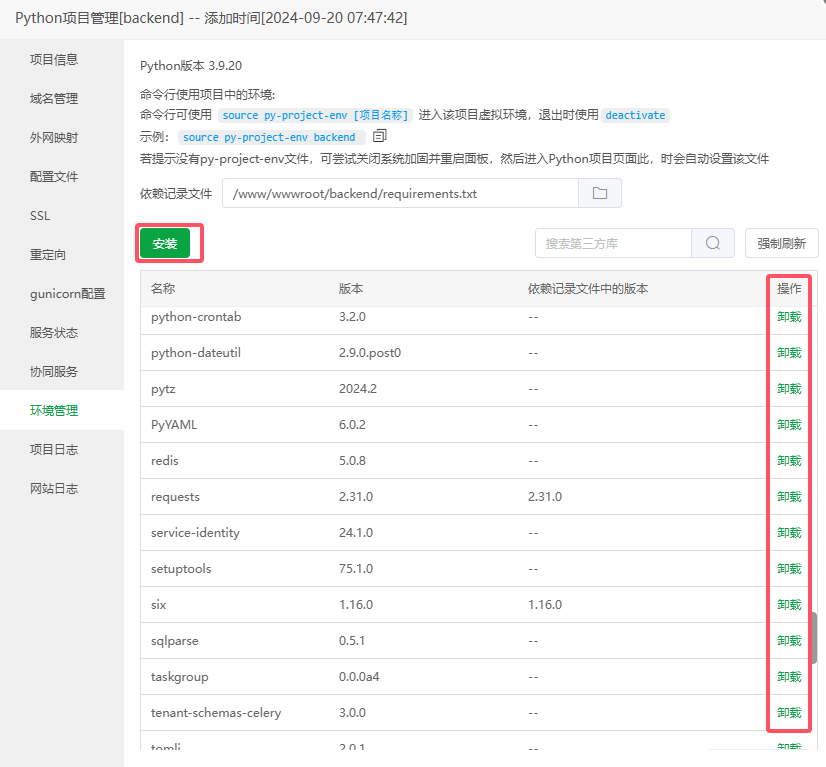
刚才添加的Python项目--设置--环境管理,查看是否依赖库已全部安装。如果没有,点击选择“依赖的记录文件”--安装。
执行数据库迁移:点击项目右侧的"终端"按钮,执行命令

sh
python manage.py migrate
python manage.py init
python manage.py init_area
刚才添加的Python项目--点击“启动”

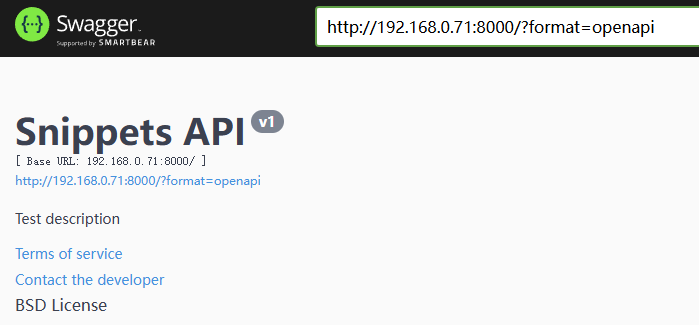
通过http://192.168.0.71:8000/访问后端:
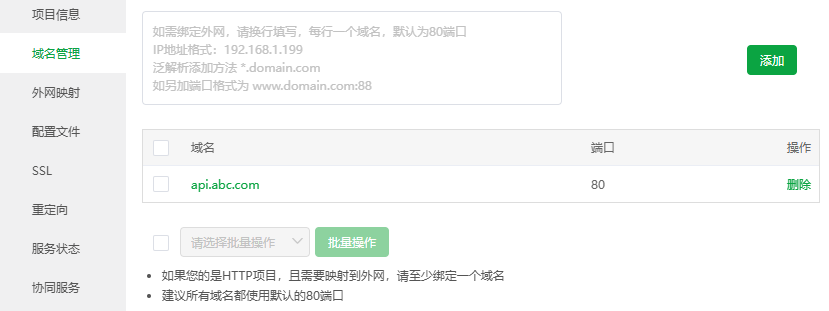
配置后端域名(可选)
登录宝塔--网站--Python项目,刚才添加的项目--设置--域名管理,添加后端访问域名。
如果没有域名,请忽略。
上传前端
配置前端生产环境配置文件:django-vue3-admin\web\.env.production
python
# 线上环境
ENV = 'production'

# 线上环境接口地址
VITE_API_URL = 'http://192.168.0.71:8000'

# 是否启用按钮权限
VITE_PM_ENABLED = true构建(Build)前端:将源代码转换成可部署的静态文件或服务器可以运行的文件。进入前端目录django-vue3-admin\web,执行
sh
npm run buildbuild成功之后,会在django-vue3-admin/web/dist目录生成部署需求的静态文件。将文件夹dist,整个压缩为一个zip文件。
登录宝塔--文件--/www/wwwroot,点击上传刚才创建的dist.zip文件。上传成功后,右击选择解压。
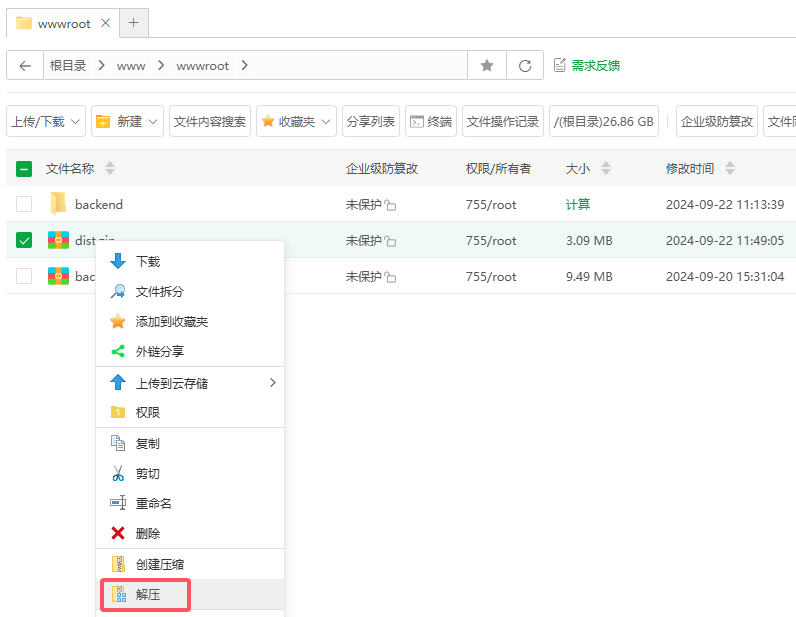
解压后,将dist右击选择重命名为web

部署前端
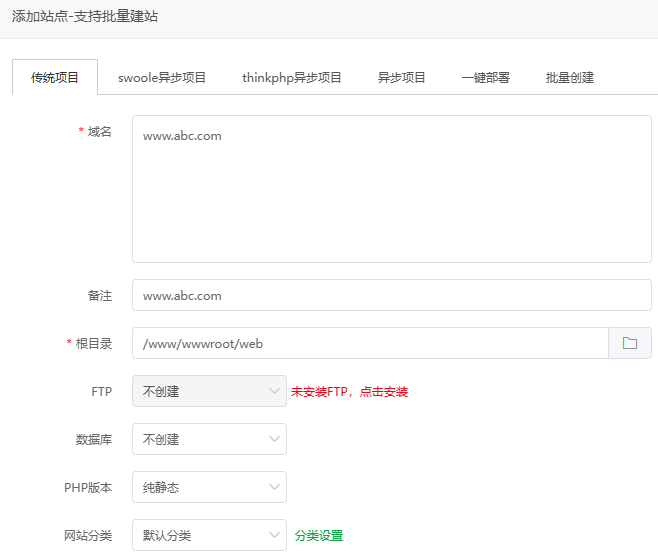
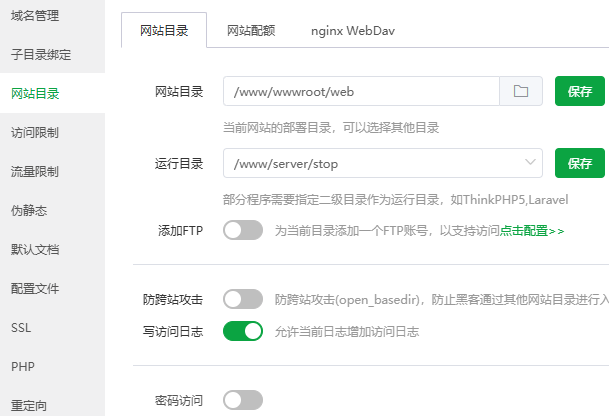
登录宝塔--网站--PHP项目,点击添加站点。按图填写信息。
- 域名:按实际填写域名。如果没有域名,填写IP地址。
测试生产环境
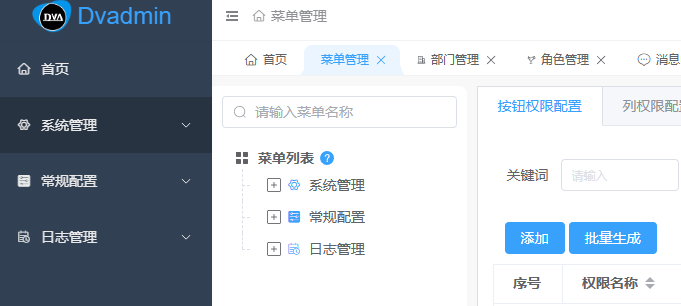
打开浏览器,通过IP或域名访问并能正常登录。
排错指南
数据库用户名不合法
错误描述:宝塔安装了MySQL8.0,在添加数据库时,提示【用户名不合法】
解决方法:用户名不要使用root,填写其它用户名。
Python项目启动失败
错误描述:宝塔中的网站--Python项目,点击启动项目,还是显示未启动。
解决方法:
点击相应的Python项目--项目日志
sh
[2024-09-20 09:18:47 +0000] [2661] [INFO] Starting gunicorn 21.2.0
[2024-09-20 09:18:47 +0000] [2661] [INFO] Listening at: http://0.0.0.0:8000 (2661)
[2024-09-20 09:18:47 +0000] [2661] [INFO] Using worker: uvicorn.workers.UvicornWorker
[2024-09-20 09:18:47 +0000] [2662] [INFO] Booting worker with pid: 2662
Failed to find attribute 'application' in 'main'.
[2024-09-20 09:18:47 +0000] [2662] [INFO] Worker exiting (pid: 2662)
[2024-09-20 09:18:47 +0000] [2663] [INFO] Booting worker with pid: 2663
Failed to find attribute 'application' in 'main'.
[2024-09-20 09:18:48 +0000] [2663] [INFO] Worker exiting (pid: 2663)
[2024-09-20 09:18:48 +0000] [2661] [ERROR] Worker (pid:2662) exited with code 4
[2024-09-20 09:18:48 +0000] [2661] [ERROR] Worker (pid:2663) was sent SIGTERM!
[2024-09-20 09:18:48 +0000] [2661] [ERROR] Shutting down: Master
[2024-09-20 09:18:48 +0000] [2661] [ERROR] Reason: App failed to load.点击相应的Python项目--项目信息。填写正确的入口文件/www/wwwroot/backend/application/wsgi.py,通讯协议wsgi,应用名称application,启动用户root
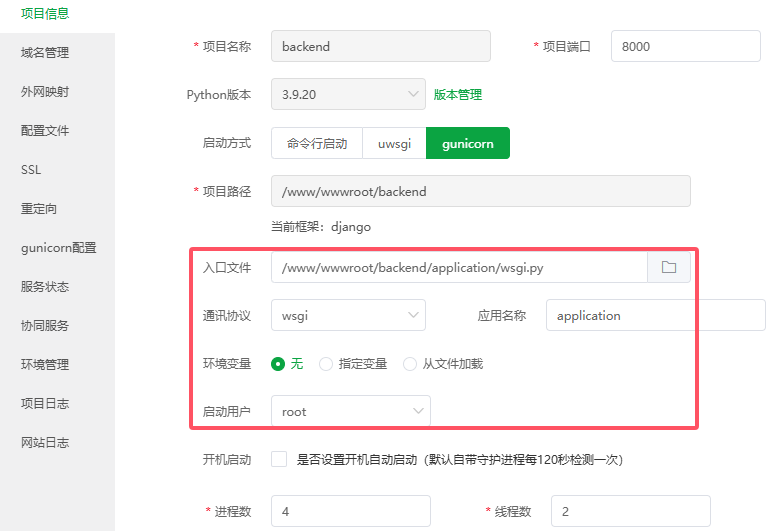
说明:2024年9月测试,上述方法启动失败,提示Internal Server Error。启动方式需要使用命令行启动,见下一小节。
后端提示Internal Server Error
错误描述:项目运行中,访问后端,页面提示Internal Server Error
解决方法
登录宝搭,点击相应的Python项目--项目日志
sh
[2024-09-21 10:40:45][uvicorn.error.run_asgi():413] [ERROR] Exception in ASGI application
Traceback (most recent call last):
File "/www/server/pyporject_evn/backend_venv/lib/python3.9/site-packages/uvicorn/protocols/http/h11_impl.py", line 408, in run_asgi
result = await app( # type: ignore[func-returns-value]
File "/www/server/pyporject_evn/backend_venv/lib/python3.9/site-packages/uvicorn/middleware/proxy_headers.py", line 84, in __call__
return await self.app(scope, receive, send)
File "/www/server/pyporject_evn/backend_venv/lib/python3.9/site-packages/uvicorn/middleware/asgi2.py", line 16, in __call__
instance = self.app(scope)
TypeError: __call__() missing 1 required positional argument: 'start_response'
[2024-09-21 10:40:45][uvicorn.access.send():478] [INFO] 192.168.0.193:4311 - "GET /favicon.ico HTTP/1.1" 500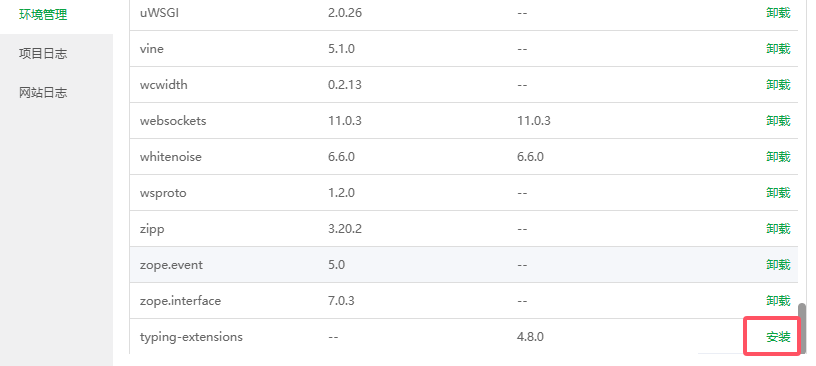
登录宝搭,点击相应的Python项目右侧的终端,
sh
#安装`typing-extensions`
pip install typing-extensions==4.8.0
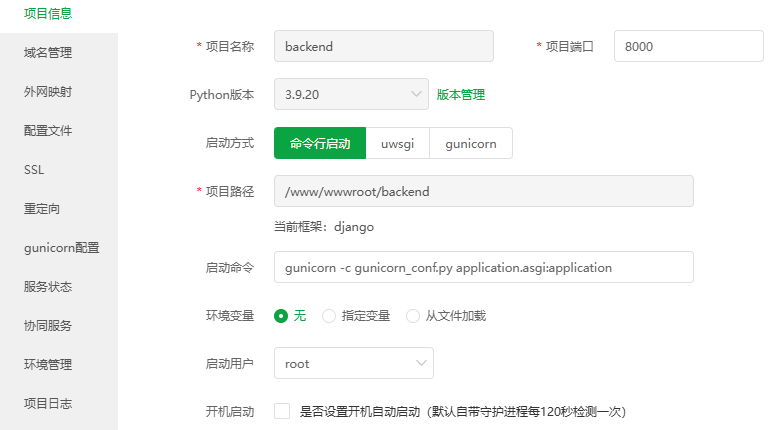
登录宝搭,点击相应的Python项目--项目信息
- 启动方式:命令行启动
- 启动命令:
gunicorn -c gunicorn_conf.py application.asgi:application
后端无法访问
错误描述:宝塔显示项目状态已启动,但无法访问
解决方法:
登录宝搭,点击相应的Python项目--项目日志
sh
django.core.exceptions.ImproperlyConfigured: Error loading MySQLdb module.
Did you install mysqlclient?
登录宝搭,点击相应的Python项目右侧的终端

sh
#安装Linux系统相关依赖
apt update
apt install python3-dev default-libmysqlclient-dev build-essential pkg-config

#安装低版本mysqlclient
pip install mysqlclient==2.2.0

#关闭Ubuntu防火墙
systemctl stop ufw
systemctl disable ufw
进入项目的Python虚拟环境
SSH登录到服务器,或登录宝塔--终端
命令行可使用 source py-project-env [项目名称] 进入该项目虚拟环境,退出时使用deactivate。示例:
sh
#进入项目虚拟环境
source py-project-env backend

#退出项目虚拟环境
deactivate

#进入项目目录
cd /www/wwwroot/
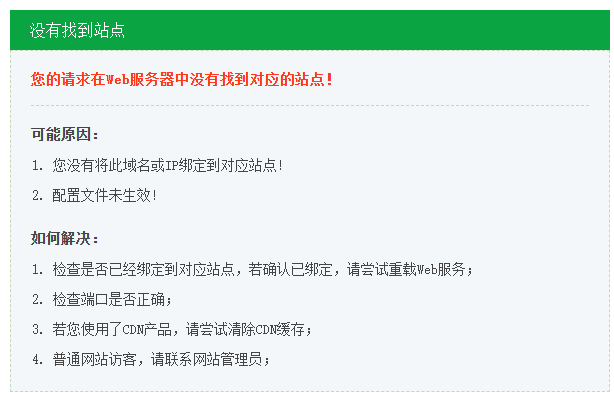
访问前端没有找到站点
错误描述:通过IP地址访问前端提示:【没有找到站点】
解决方法一:
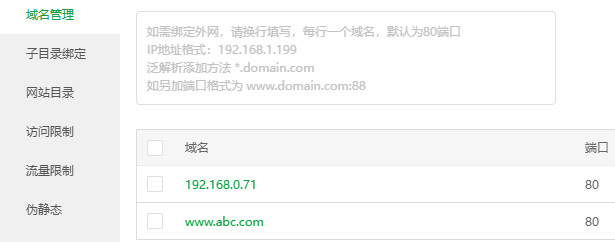
登录宝塔--网站--PHP项目,点击对应的前端项目。在域名管理里,添加对应的IP地址。这样就能以IP地址访问前端页面。

解决方法二:
打开本机c:\Windows\System32\drivers\etc\hosts文件,添加域名记录。,例如:
sh
192.168.0.71 www.abc.comhosts文件修改方法:
- 使用记事本打开hosts文件,添加内容后会另保存为hosts.txt文件
- 删除原来的hosts文件,将hosts.txt文件生命名为hosts文件
因为部署前端添加PHP站点时,填写也域名,所以要用对应的域名访问(不能使用IP访问)。
访问前端Network Error
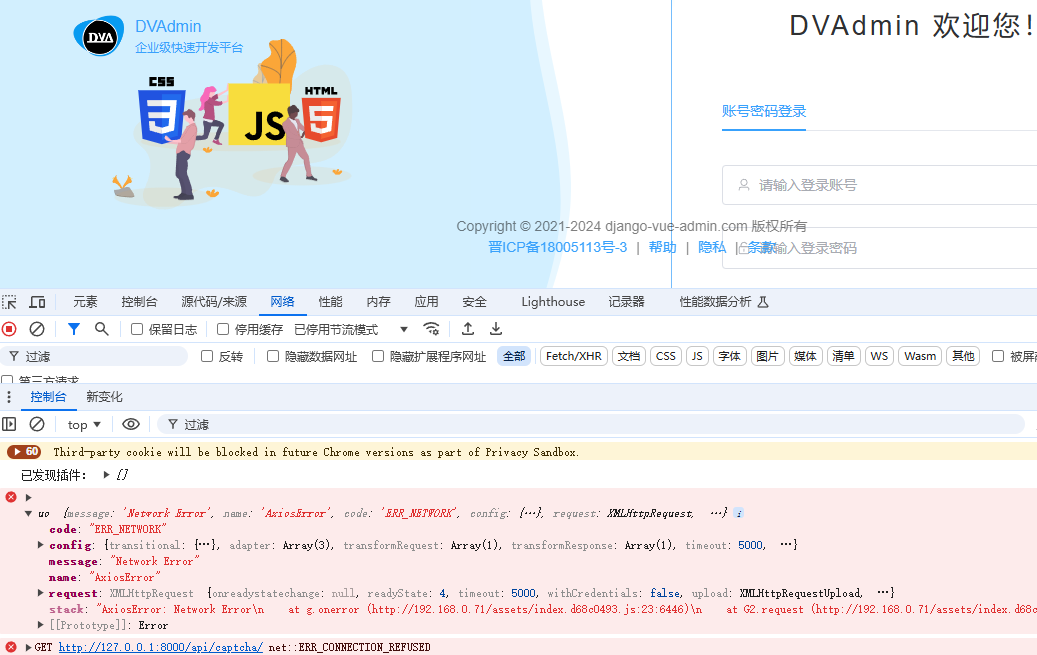
错误描述:访问前端提示:【Network Error】
解决方法
打开浏览器的开发者工具,看到访问api地址为http://127.0.0.1:8000/api/captcha/。配置前端生产环境配置文件:`django-vue3-admin\web\.env.production`有错导致。
#VITE_API_URL = 'http://127.0.0.1:8000' 修改为:
VITE_API_URL = 'http://192.168.0.71:8000'
前端重新build,打包上传部署。
前端部分界面不见了
错误描述:在开发环境上,我增加了页面,但部署到生产环境上,部分页面不见了。

解决方法:
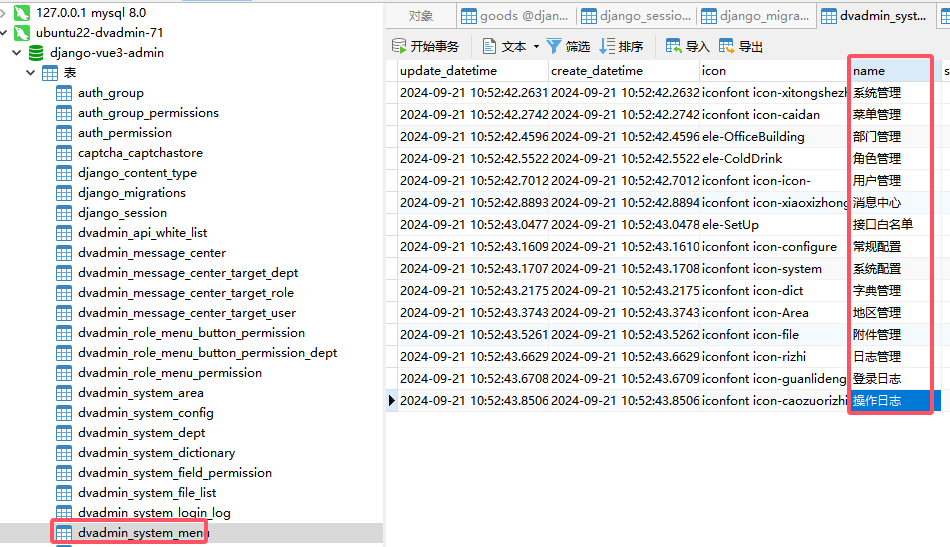
使用navicat工具登录生产环境的数据库,发现dvadmin_system_menu表,没有新增的菜单数据。
进入开发环境的django-vue3-admin\backend目录,执行
sh
#待补充参考资料
- 宝塔Linux面板
- 宝塔面板官方文档
- Ubuntu 22.04下载地址
- Django-vue3-admin项目文档
- Ubuntu Server 22.04 系统性能优化
- linux系统优化脚本
- CentOS下载地址
- CentOS版本与内核对照表
有任何疑问,欢迎在技术交流区留下您的见解,一起交流成长!